Announcement

Collapse
No announcement yet.

DIY Paint Help

Collapse
X
 
  • Filter
  • Time
  • Show
Clear All
new posts

  • DIY Paint Help

    I picked up a mahogany body really cheap off E-bay. I haven't painted a guitar or much of anything before so I thought I would try a Bengal style pattern just to see how it would turn out. So after removing the tape that created the black stripe pattern, I have little ridges of yellow paint along where the yellow and black meet. Some will just break off by hand leaving a pretty smooth transition. Other look like it will require sanding or something to smooth it out. Any ideas or tips to remove these ridges without wrecking everything? I will be clearing it once the body is touched up.

    I imagine it will require a really fine sandpaper. I am happy with the overall outcome so far. I was surprised more yellow didn't bleed through. I painted over the tape with a light coat of black to try and seal it in, you can see on the right of the pickup there is a yellow splotch, but overall it seems that technique works.

    Mahogany is cool, it has a grain to it that gives is a unique look.
    "We were sitting on the bus one day and there were 5 of us hanging out. There was only one beer left in the cooler and we actually all took a little cup and split it. It was a pathetic day in a rock and roll when five grown men have to be sitting there sharing a beer. "
    Zakk Wylde

  • #2
    Lightly wet sand it first.
    Apply a few thin coats of clear and wet sand it lightly. Repeat this until the ridges disappear. Once you see the color on your sand paper, stop. This means you have gone into the color coat, and you dont want the black to show through the yellow.
    The clear coat acts as a filler as well, so it will hide and smooth it at the same time.
    'Howling in shadows
    Living in a lunar spell
    He finds his heaven
    Spewing from the mouth of hell'

    Comment


    • #3
      Hey that makes sense! Thanks very much.
      "We were sitting on the bus one day and there were 5 of us hanging out. There was only one beer left in the cooler and we actually all took a little cup and split it. It was a pathetic day in a rock and roll when five grown men have to be sitting there sharing a beer. "
      Zakk Wylde

      Comment


      • #4
        Just clear it, then worry about wetsanding and getting it all level.

        Comment


        • #5
          If you are seeing the grain of the wood even after painting it, that means you should have used wood sealer to seal the grain so it doesn't soak up the paint.
          If you want, you can wet sand the entire guitar, cause the paint that is on it can be used as your 'sealer', then start all over again by painting it black, then masking that, and spraying the yellow again.

          Unless of course, you like that look, then leave it as is and keep going.
          'Howling in shadows
          Living in a lunar spell
          He finds his heaven
          Spewing from the mouth of hell'

          Comment


          • #6
            I've done Bengals over and over Trail and error baby. Once you get sick of sanding, you make sure to get it right.
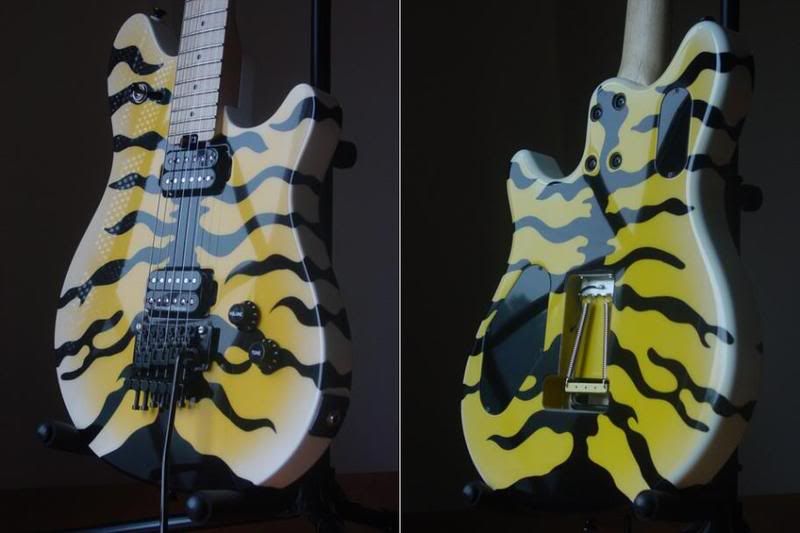
            I prefer to start with the lightest colors and add dark on top (white, yellow, orange, black).

            If that ridge is high between the black and yellow, I'd take it down lightly before doing the clear coats as mentioned above.

            When I did my last Bengal, I went with a jagged edge instead of a hard edge. I did this by using a ripped edge of tape. Kind of to simulate the fur.

            For doing feathered edge for camo (using rattle cans), I cut out the camo pattern and use double sided tape to keep the pattern slightly above the surface of the guitar.

            Comment


            • #7
              A great paint job is all in the grain sealing. You can bury alot of it in clear after, but it will eventually come back.
              Custom Guitars, Refinish and restorations.
              http://www.learnguitars.com

              Comment


              • #8
                Sorry ... I couldn't view the picture at the time I responded. :o

                You gotta seal it bro.
                Otherwise your clear will sink into the grain just like your basecoats have.
                It'll look like poo.

                If you're going for that "factory finish" look, you'll have to strip it, seal it, and start over.

                Comment


                • #9
                  Ok last night I got the paint stripped off. So I have been reading up on the grain fillers for soft woods like mahogany. Any recommendations for products that are usable by noobs like me? Thanks again for the help!

                  I was looking at a M-1 the other day, actually more like marveling at it. How do they get the smooth transition between the cream\white and yellow? I am going to just go yellow/black but it amazes me how they do that. Is each M-1 slightly different or are they using a template?
                  "We were sitting on the bus one day and there were 5 of us hanging out. There was only one beer left in the cooler and we actually all took a little cup and split it. It was a pathetic day in a rock and roll when five grown men have to be sitting there sharing a beer. "
                  Zakk Wylde

                  Comment


                  • #10
                    read this.

                    read "reranch 101" over and over and over and over and over again.

                    then go read it again.
                    Sully Guitars - Built by Rock & Roll
                    Sully Guitars on Facebook
                    Sully Guitars on Google+
                    Sully Guitars on Tumblr

                    Comment


                    • #11
                      Originally posted by FlyingSkull View Post
                      Ok last night I got the paint stripped off. So I have been reading up on the grain fillers for soft woods like mahogany. Any recommendations for products that are usable by noobs like me? Thanks again for the help!

                      I was looking at a M-1 the other day, actually more like marveling at it. How do they get the smooth transition between the cream\white and yellow? I am going to just go yellow/black but it amazes me how they do that. Is each M-1 slightly different or are they using a template?

                      I did this one awhile back ...
                      After prepping the body, sealing the grain and using primer, I sprayed the yellow basecoat.
                      Then I made templates out of posterboard and covered the front and back of the body.
                      I used rolled up masking tape to secure the templates and suspend them about an inch or so off the body, then I sprayed the white from the sides and allowed overspray to help create the "burst" effect. Then I sprayed clearcoat.

                      Next, I taped up the entire body, drew out the graphics, and carefully cut them out using a razor. Clearcoating the body prior to cutting out the graphics helped prevent cutting through the paint and leaving unwanted marks and blemishes.

                      [/QUOTE]

                      Comment


                      • #12
                        Originally posted by sully View Post
                        read this.

                        read "reranch 101" over and over and over and over and over again.

                        then go read it again.
                        Hey thanks that is great.
                        "We were sitting on the bus one day and there were 5 of us hanging out. There was only one beer left in the cooler and we actually all took a little cup and split it. It was a pathetic day in a rock and roll when five grown men have to be sitting there sharing a beer. "
                        Zakk Wylde

                        Comment


                        • #13
                          That is killer Model1VH2!!
                          I am guessing after cutting out the stripe patterns you sand down the clear before painting the black?
                          The burst effect looks so even throughout the guitar, looks very pro!
                          "We were sitting on the bus one day and there were 5 of us hanging out. There was only one beer left in the cooler and we actually all took a little cup and split it. It was a pathetic day in a rock and roll when five grown men have to be sitting there sharing a beer. "
                          Zakk Wylde

                          Comment


                          • #14
                            Please read.

                            Originally posted by DonP View Post
                            For doing feathered edge for camo (using rattle cans), I cut out the camo pattern and use double sided tape to keep the pattern slightly above the surface of the guitar.
                            Same applies to a burst. Just like Model1VH2 said, you keep the pattern up off the body. Make sure you paint at a 90 degree angle to the body masking or paint will get in underneath.

                            Comment


                            • #15
                              Originally posted by FlyingSkull View Post
                              That is killer Model1VH2!!
                              I am guessing after cutting out the stripe patterns you sand down the clear before painting the black?
                              The burst effect looks so even throughout the guitar, looks very pro!
                              Thanks!
                              Here's what it looked like right after shooting the burst.


                              I only shot one coat of clear just to help protect the paint.
                              You don't want to sand after shooting the black stripes.
                              Remember ... the black stripes are now on top of the clearcoat.

                              In order to do the graphics, I taped together multiple sheets of tracing paper and traced the outline of the front and backside of the body. This allowed me to experiment a little with the placement of the stripes and the actual pattern.


                              Then once I had what I wanted, I used "Stickey Mickey's" masking paper to mask the entire body. You can find "Stickey Mickey's" at Eastwood and most other automotive paint supply stores. Then I taped carbon paper to the backside of the tracing paper that I drew the graphics on so when I went over the design, the carbon left the grphics on the body itself.
                              Then I just cut it all out.

                              Comment

                              Working...
                              X