Announcement

Collapse
No announcement yet.

Salvage Project w/pix

Collapse
X
 
  • Filter
  • Time
  • Show
Clear All
new posts

  • Salvage Project w/pix

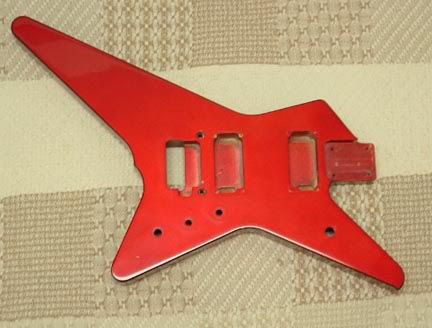
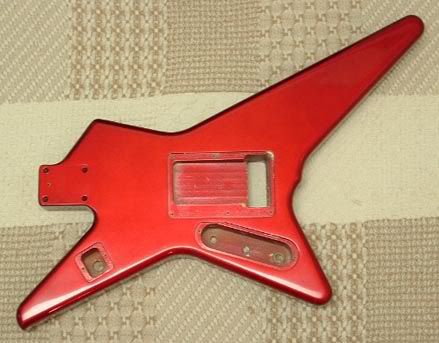
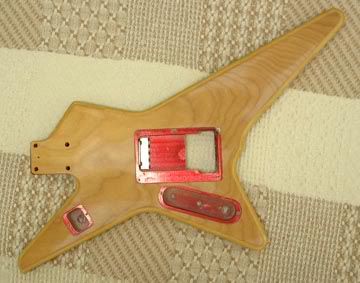
    I decided it might be worth a few laughs to take a shot at turning my old crappy '84 Ibanez DT350 (my first electric, btw [img]/images/graemlins/headbang.gif[/img] [img]/images/graemlins/laugh.gif[/img]) into something I actually might want to play. I just picked up a Model Series neck for it, & started work on the most critical part of the project: the bridge conversion. The guitar originally came with the infamous Ibanez Pro Rock'r single-locking trem. Words can't describe how bad this thing was. It had to go. The tricky part was that the post spacing was well over 3" and they were well behind the position Floyd posts would take, since the saddles on the Pro Rock'r are right about in line with the posts, rather than ~1/2" behind like on a Floyd. Some "before" pics:


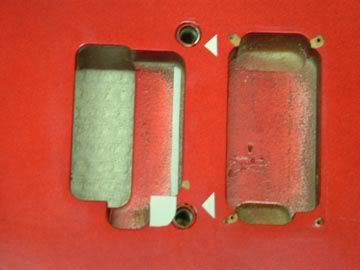
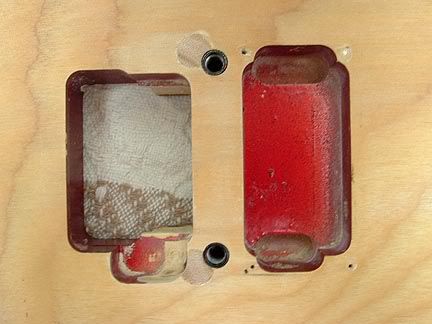
    Here the arrows show about where the Floyd bushings will go, & the white paper shows the mod needed for the route. I briefly considered leaving the old bushings in, filling with Bondo, & using woodscrew posts for the Floyd, but this is a basswood body & there isn't much wood there for stability. A recipe for disaster. So I pulled the old bushings, dowelled & drilled for the Floyd bushings. Getting the old bushings out was super easy. I'll go ahead & post how I did it, since I remember reading how someone drilled through the back of the body to tap theirs out, & this might help someone. I made an extractor using one of the old posts, a nut that matched the threads, one small washer, & a stack of large washers with an inner diameter bigger than the bushings. I ran the nut all the way up on the post, then the small washer, then the large washers. I screwed the post into the bushing a couple of turns, then using the the allen wrench to keep the post from turning, tightened down on the nut to pull the bushing up through the stack of washers and out of the body.

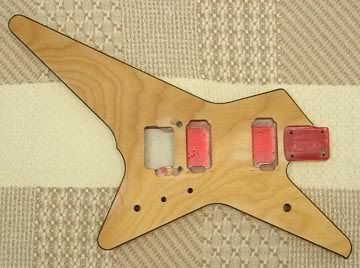
    Pics after paint removal, dowels glued in, new bushings installed, route roughed in:


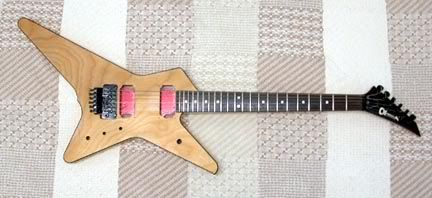
    Here it it with a JT-6 in place. It will have this trem until I decide the project is a success and it is "OFR-worthy" [img]/images/graemlins/laugh.gif[/img]. After I took the pics, I put the old neck on & strung it up (still waiting on the new neck). I think it's going to work out pretty well, but the claw to block distance is shorter than normal. Can I get shorter springs? Should I just cut these down a bit? I really don't want to remove any more wood, but I guess I could cut a recess for the claw if I have to. Advice? The next step will be to fill up the gaping hole behind the new trem. I'll probably leave a shallow recess there. When I first started on this project, I was thinking about reshaping the body a bit to make it more of a Charvel shape by eliminating & rounding over the sharp accents, but I like the black binding & I don't know if I have the skill to redo the route for the binding if I mess with the shape. Any opinions or tips on this would be appreciated. Also, I'm looking for color suggestions. It will have a rosewood board & black hardware. I'm thinking something light would go well with the binding, but Newc's color change paint thread got me thinking that green/gold or green/copper might look pretty cool.

  • #2
    Re: Salvage Project w/pix

    [ QUOTE ]

    I made an extractor using one of the old posts, a nut that matched the threads, one small washer, & a stack of large washers with an inner diameter bigger than the bushings. I ran the nut all the way up on the post, then the small washer, then the large washers. I screwed the post into the bushing a couple of turns, then using the the allen wrench to keep the post from turning, tightened down on the nut to pull the bushing up through the stack of washers and out of the body.


    [/ QUOTE ]

    Yeah, that was mine too [img]/images/graemlins/laugh.gif[/img]

    And the color-change stuff would look great [img]/images/graemlins/toast.gif[/img]

    Newc
    I want to depart this world the same way I arrived; screaming and covered in someone else's blood

    The most human thing we can do is comfort the afflicted and afflict the comfortable.

    My Blog: http://newcenstein.com

    Comment


    • #3
      Re: Salvage Project w/pix

      [ QUOTE ]

      Yeah, that was mine too [img]/images/graemlins/laugh.gif[/img]


      [/ QUOTE ]

      I'll fess up. I was working in my dad's garage since his tool collection makes mine look like a joke, & I was thinking of getting the bushings out with a slide-hammer. I had it about rigged up, he walks though, takes a quick look & says, "Steady pressure, steady pressure. Make yourself up an extractor." [img]/images/graemlins/idea2.gif[/img] So in this case, the "great minds thinking alike" would be Newc & my dad. [img]/images/graemlins/laugh.gif[/img]

      Comment


      • #4
        Re: Salvage Project w/pix

        Great project, and nice work so far. Please keep us posted with more pics.

        Comment


        • #5
          Re: Salvage Project w/pix

          I think hose little subtle points and the binding are just cool as hell! (is that an oxymoron?) Anyway, keep up the good work, this should turn out very nice indeed! [img]/images/graemlins/toast.gif[/img]
          My goal in life is to be the kind of asshole my wife thinks I am.

          Comment


          • #6
            Re: Salvage Project w/pix

            Oh and my other 2 pennies....it ain't a Charvel nor will it ever be so why fuk it up to try to make it look like one? Go with what ya got and be original!!! That'll be a cool axe when your done.
            My goal in life is to be the kind of asshole my wife thinks I am.

            Comment


            • #7
              Re: Salvage Project w/pix

              [ QUOTE ]
              Oh and my other 2 pennies....it ain't a Charvel nor will it ever be so why fuk it up to try to make it look like one? Go with what ya got and be original!!! That'll be a cool axe when your done.

              [/ QUOTE ]

              Excellent point! That's what I was starting to come around to thinking, especially as the paint was coming off. I never really thought of it as a very good-looking guitar when it was red, but the light wood with black binding looks pretty nice around the points. When it comes time for paint, I'll have many questions for you. One concern I have now involves the binding. I figure I'll mask it for the color coats, then the clear will cover the binding. To avoid a ridge, I'll need to sand to feather it into the binding, right? If I go with the color change paint kit (base, color,clear), I don't know if I can sand between coats. The directions I've found seem sketchy on how quickly you have to apply the next coat. I guess I can do a test, the kits aren't too expensive. Maybe wait to sand out the ridge till between multiple clear coats? I dunno... There's a ton left to do in the meantime, anyway. Any thoughts on the spring issue? I've got plenty & was just thinking about grabbing 3 and clipping 'em to see how it works. [img]/images/graemlins/laugh.gif[/img]

              Comment


              • #8
                Re: Salvage Project w/pix

                Got my neck. This is my first bolt-on Model Series neck, & I like it! I slapped it together for a quick check. It fits great & plays really well, but I may need to sand a tiny bit from the top of the neck pocket. It's off center by 1/32nd or so. More of a visual thing than a playability issue. I shortened a couple of trem springs by about 1cm & it worked like a champ, so no cavity mod to move the claw. Time to finish up the body & prep for paint. Here's a quick & crappy pic.


                I think the headstock goes well with the body shape. Oh, & if anyone can offer a bit of advice about my painting question regarding the binding I'd really appreciate it. I've read lots of online articles, but haven't found anything specific. It does seem like the best time to eliminate a ridge will be after the clear, but if someone with experience knows for sure, it sure would help.

                Comment


                • #9
                  Re: Salvage Project w/pix

                  I would ask RoyB.send him a P.M.He does a lot of refinishing and may I say his paint jobs kick ass!!!
                  Really? well screw Mark Twain.

                  Comment


                  • #10
                    Re: Salvage Project w/pix

                    Looks great man!

                    Can you give me some tips on how you got the JT6 trem post holes in the correct places? Im planning on doing some projects where I put a Floyd Rose on a strat, but I dont know how I can get the posts positioned correctly, and Im afraid I will mess it up and it will never tune or feel right.

                    Good luck with the rest of it. [img]/images/graemlins/smile.gif[/img]

                    Comment


                    • #11
                      Re: Salvage Project w/pix

                      you're probably going to have a ridge no matter what; i just checked three guitars that are here (w/binding) and they all have ridges from the factory. it's no big deal.

                      i wouldn't use the flip flop color, but that's just b/c i'm not a fan of it. i'd go with kawasaki green with black binding and black hardware, but you can see i'm a bit biased:


                      sully
                      Sully Guitars - Built by Rock & Roll
                      Sully Guitars on Facebook
                      Sully Guitars on Google+
                      Sully Guitars on Tumblr

                      Comment


                      • #12
                        Re: Salvage Project w/pix

                        That green is tooooo cool Sully! I'm glad to see the bright colors coming back, I love 'em!
                        I agree about the paint "ridge" at the binding, it'll always be there. With three or four good coats of clear and some light wet-sanding you can virtually eliminate them though. Just be damn careful sanding around the edges and go SLOW! You'll cut throught the clear before you know it. Same goes with buffing too.
                        My goal in life is to be the kind of asshole my wife thinks I am.

                        Comment


                        • #13
                          Re: Salvage Project w/pix

                          That green is awesome! That thing is so sweet, now you've got me thinking about filling in the neck pickup route & switch & moving the jack! [img]/images/graemlins/laugh.gif[/img] Thanks for the replies about the ridge. You could feel it just slightly in the factory finish, so I'll just try to minimize it after clear-coating. I went out shopping for supplies yesterday & took a look at some of the color change kits. Seeing as they all use a black base, I think the binding will kinda get lost. 7-up green was another thought, but I like a maple board with that color & again I think I need something lighter to contrast with the binding. My wife thinks cream or pearl would be best. Still thinking it over.

                          nonamemx, if you're putting a Floyd on a Fender Strat, the Floyd installation directions actually have a template page that you can attach to the Strat's existing trem-mounting holes to show where to drill for the posts. In my case, I had to take measurements to get the alignment, post spacing and scale length right.

                          Comment


                          • #14
                            Re: Salvage Project w/pix

                            agree on the cream, or pearl white; i'm a big fan of that as well.

                            thanks for the props.

                            sully
                            Sully Guitars - Built by Rock & Roll
                            Sully Guitars on Facebook
                            Sully Guitars on Google+
                            Sully Guitars on Tumblr

                            Comment


                            • #15
                              Re: Salvage Project w/pix

                              [ QUOTE ]


                              nonamemx, if you're putting a Floyd on a Fender Strat, the Floyd installation directions actually have a template page that you can attach to the Strat's existing trem-mounting holes to show where to drill for the posts. In my case, I had to take measurements to get the alignment, post spacing and scale length right.

                              [/ QUOTE ]

                              [img]/images/graemlins/smile.gif[/img]

                              Thanks alot! sweet. . .

                              Comment

                              Working...
                              X