Announcement

Collapse
No announcement yet.

First attempt at fretwork.

Collapse
X
 
  • Filter
  • Time
  • Show
Clear All
new posts

  • First attempt at fretwork.

    I got all the tools, a neck to practice with (thanks again Trem!!), and a free day to take a shot at my first level/crown/polish. Now that I'm done, the overall statement I have would be "Why the fuck didn't I try this sooner?..." The whole process from start to finish took exactly an hour. Now that I've done it, I understand all the instruction and tips I got (thanks to all..) and it really is a straightforward, fairly easy process if you pay attention to what you're doing. I didn't get a before pic and my photography skills may be sub-par but here's a quick synopsis of what I did:
    Here's the tools I used.

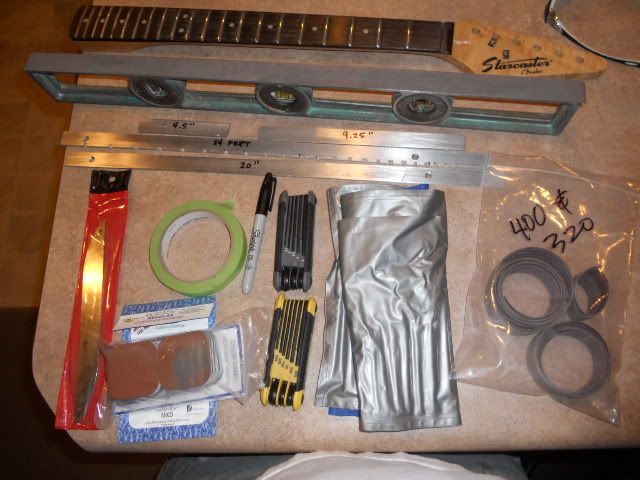
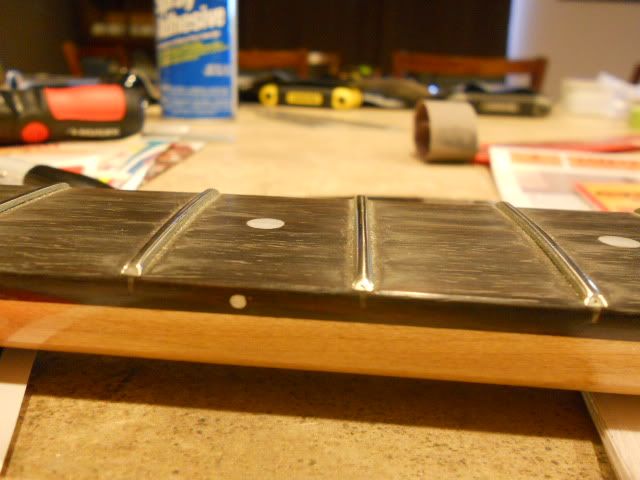
    I straightened the neck, spray adhesived the 320 grit paper to the lapped flat edge of the level (beam for our purposes), sharpie'd the tops, and had the wife-ish hold the neck steady. Started at the center moving the beam about 2" strokes, slowly moving to the treble side, lifted and again starting at the center towards the bass side. Material removal goes pretty quick but not uncontrollable even for a newbie. Kept doing the same thing over and over till it was sanding every fret, took about 20 minutes cause I was going slow and methodical. Then I put 2 pieces of tape on the 10th fret and tape over 1/2 the length or the sandpaper to run smoothly for the fallaway which only took 3 times over the board to hit everything past the 12th fret. Viola, everything was nice and straight and level. Woohoo, must be doing it right!!! And only 1/2 hour into it. Sharpie'd the tops again and started crowning a few frets. Very simple and quick with this file. Ground till there was a very thin line on the top of each fret. Starting to look round.. Again.. seems like I'm on the right track.. Grabbed the Micro-mesh pads. Grabbed the 1500 and held in a curve over my finger and ran it back and forth about 10 times up and down the board. Holy shit.. They're rounded, and pretty perfectly.. There's 10 different grit pads (1500-12000) and I did the same thing with all of them. Took literally about 5 minutes to do it all. After the pads, they look perfectly rounded and like sterling silver. Feel perfectly polished and smooth. Here it is done.

    When I do the non-practice necks, I'll take the 12000 pad and polish like jewels. I got some pics but they're crappy. I'll be taking plenty of pics and/or videos when I do the Soloists so anyone who's interested, stay tuned. I'll be doing them in the next few days.
    Last edited by warlok; 09-16-2010, 02:20 AM.
    Every man dies... Not every man really lives!!

  • #2
    Looks good! Recrowning has never looked scary to me. It's refretting that I fret about.
    Scott

    Comment


    • #3
      I don't know why it scared me. Fear of fucking up a good thing I guess. Scared of refretting though.. for now..
      Every man dies... Not every man really lives!!

      Comment


      • #4
        I still don't understand how they level and crown a compound radius board. Seems like Magic and hokus pokus stuff to me.

        Nice job on your first attempt!!!
        -------------------------
        Blank yo!

        Comment


        • #5
          You just fan the end out, it's hard to explain... You follow the string lie. The heel is wider than the nut, so you move the heel end a little quicker than the nut end when you go across.

          The part that takes the longest is masking off the board/guitar etc. and then getting the scratches out of the frets. On regular nickle frets you can be a little less careful because the strings will smooth any slightly rough edges the first time you bend a string, but with stainless frets, they will just saw right through he strings before they ever feel smooth.

          Comment


          • #6
            GT - that had me confused as well and was part of why I was scared. But even though the one I did isn't compound, I see now why it doesn't make much of a difference. Like Jazz said, it's the same process just moving the heel end slightly faster than the nut end to stay in line with the strings as your moving.

            Jazz - the scratches came out almost instantly with the micromesh pads. What do you use after crowning? If you don't use these, you may want to give them a try. Only around $8 shipped off ebay for 2 sets of 2" pads. Biggest thing I found is that the right tools really made it easier than it would be without them.
            Every man dies... Not every man really lives!!

            Comment


            • #7
              Once you have this down, a re-fret can't be too far off. I absolutely have vintage frets and think every guitar should have jumbos or super jumbo frets installed.

              Comment


              • #8
                Originally posted by DonP View Post
                I absolutely have vintage frets and think every guitar should have jumbos or super jumbo frets installed.
                Then I guess you shouldn't have vintage frets!


                bu-dum-bum-chish
                -------------------------
                Blank yo!

                Comment


                • #9
                  Nice job War!
                  That neck had some fairly low divots and valleys eh..

                  Comment


                  • #10
                    I did this recently to a guitar for practice. It was all messed up when it came in. No nut, jack broken, all beat up and stickers every where. Pulled off all the stickers made a new nut replaced the jack. Then went at the frets. Divited and just plain uneven. Took me a few tries and several restrings but i finally got it all nice and even with no buzz. Plays great and frets are glassy smooth and blinding. But i dont get the whole difference in leveling techniques between compound radius and single radius.

                    War nice job looks good.
                    Gil

                    Comment


                    • #11
                      Hell yeah trem. But it was good practice cause my Pro has nearly as bad. Not in the same area though - You only play solos and weird chords with that thing?? lol

                      Jacksonfreak - If you look at most compound necks, they're quite a bit wider at the heel than the nut. So when you are moving the beam across the board, you move the heel end faster than the nut end to stay in line with the path of the strings. Make sense? Honestly, for whatever reason, in reading up on this, I didn't get it either. I'm going to put up a quick video when I do my Soloist Pro showing it because I suspect there's more than you and me who didn't understand from reading. Seeing is better!! Hopefully I get it done this afternoon.
                      Every man dies... Not every man really lives!!

                      Comment


                      • #12
                        Originally posted by warlok View Post
                        Jazz - the scratches came out almost instantly with the micromesh pads. What do you use after crowning? If you don't use these, you may want to give them a try. Only around $8 shipped off ebay for 2 sets of 2" pads. Biggest thing I found is that the right tools really made it easier than it would be without them.
                        Nah, I use regular sandpaper. The micro-mesh pads do look nice, though. I use 600, 1000, and 2000-grit and then I polish them up with some rubbing compound.

                        The point I was trying to get across is that you said you did this in about an hour and it was really easy. What I'm saying is, it isn't always that easy.

                        A lot of the "easy" was you're working on a bare neck with a rosewood board that you don't care about. When you are working on a guitar you really care about, where you don't want cross-grain scratches in the Ebony or scratches in the inlays, you will find that the crown and polish take significantly longer, because you will need to tape off the board, and in the case of the Soloist, the front of the guitar body, and the insides of the cutaways, etc. - you don't want to gouge the face of the guitar when you're doing the last few frets. The tip of that crowning fill will take paint down to wood in the blink of an eye with one little slip...

                        Also, with stainless frets, unlike nickle frets even the tiniest of scratches is a problem, because they won't "wear in" so that takes some extra time and caution. You can get away with fine steel wool kind of scratches in nickle frets and call it "good enough" (not that this is what you did, but you can) and a 1/2 hour of playing will get it feeling smooth as silk but if you do that with SS frets you will be sawing your strings in half.

                        Comment


                        • #13
                          Gotcha. Yeah, it took me about a 1/2 hour just to mask the board. And with taking my time and a few beer and smoke breaks it took about 2 hours. I didn't mask the body at all. Should have because I slipped a few times with the beam and oops... It's cool cause this one is going to get a refin anyway but still, the point is out there. When I do the SL1 and the Model 6, I'll protect more. I do have to say, it worked as good and better than I hoped. I got it done, wired it up, and just got done playing for the last 2 hours.. Fuckin' WOW!! What a difference. Plays like butter. I took some boring videos in the process that I'll post in a minute as well as a "this is what I found out as i did it" posts.. Stay tuned.
                          Every man dies... Not every man really lives!!

                          Comment


                          • #14
                            OK then. Fuck that shit! Signed up for youtube and tried to upload.. Takes way too long. Maybe I'll try something else tomorrow.
                            Every man dies... Not every man really lives!!

                            Comment


                            • #15
                              Yeah, I have some low-tack paper tape which I put a couple of layers of duct tape on, it's got a "cut out" for the neck and then drapes down into the cutaways, and I stick the ends down kind of wherever they land.

                              It's sort of tlike a fender blanket for a car, only for a guitar. The low-tack stuff stick to the paint well enough to keep it in place and the duct tape is soft enough to cushion most "oopses."

                              Comment

                              Working...
                              X